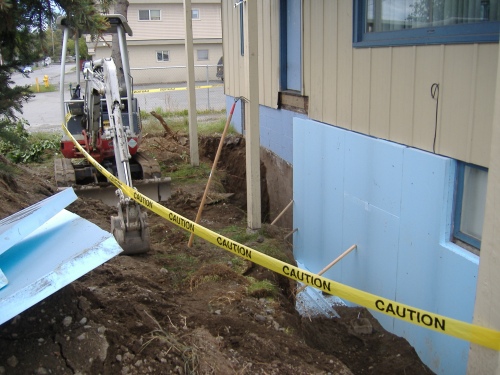
Alas, yesterday didn’t see a lot of progress what with trying to get some hours in at my paying work and Gil learning to operate the excavator – he’s good but there is a learning curve. Today will be my turn as Gil is in class all day. Luckily, we are on a week rate, where it’s no cheaper to finish Friday vs yesterday (Week rate is cheaper than 5 days at day rate). I just hope we are done with the heavy work by Friday, because I’d rather not go in to the next week. We are only supposed to operate it 8 hours a day, probably to guard against excess wear and tear and to earn the rental guys more money, but yesterday we only managed 6 before it was time for bed and we were exhausted (at 8 pm). Here are some photos, but I’m a day behind, so they are actually from Monday night:

W. side of house all done and backfilled - driveway passable.

N. side of house almost all opened up, porch ripped off, partly insulated.

Some of the huge concrete blocks we excavated, in the mayhem of the front yard (front porch, dirt mounds, ripped out lilac tree...)

A gratuitous picture of Osh and meager garden produce for the day!
In case you are wondering, I have saved two manageable clumps of the huge front lilac to replant in a better place. And it is lucky I wanted to replace my lawn with permaculture-style forest gardens anyway, because the lawn is toast! Since these pictures I have only put up an additional 2 sheets of blueboard, and we have backfilled around half of the north side, we still need to dig out the last bit of this side, insulate, and refill to be on track, since I wanted to be on the east side of the house today to be on target. At least my body gets a break while I do my desk work!

I have two columbine and some creeping thyme if you want it. (It is creeping a bit much for where I have it and it needs to be divided!) So, also, we are planning on installing a smaller version of your blueboard adventure. Did you glue it on or use mastic or covering of any kind? Just backfill?
I would love the columbine and creeping thyme – do you need anything? I know your yard is pretty mature. You could have one of the clumps of lilac or strawberries or something?
I glued the board to the foundation with a product called PL300 in the construction adhesive aisle at your favorite box store. It didn’t stick too well below the dirt line because I couldn’t get the wall clean enough in short time. So far I have just backfilled, but you are supposed to protect the board with some covering from 6″ below the dirt line all the way above ground. I plan to stucco it and add flashing at the top. I’ll let you know what products I use and the process once I figure that out!!
Osh is such a cutie! I showed Ryan the photos this morning– admittedly he was most drawn to your “mini backhoe” (his words for what to call your excavator) but then that’s not a surprise to me. Don’t suppose we could get Ryan into an eco scene and add it to the blog for more gratuitous cutie pie pics.
Oh yah, I’m all into gratuitous cute kid shots – send me the photos and I’ll tack them on!! Osh got to operate the mini backhoe from my lap, Ryan can come up and do the same next time I need one!